How to add a new Role?
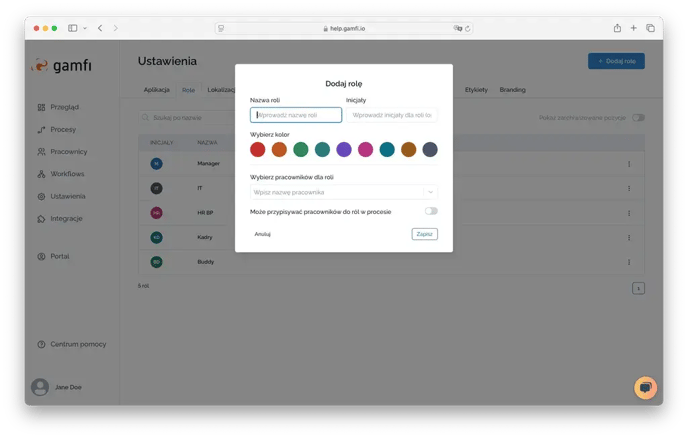
To set up a new Role, go to the "Settings" section, then click on the "Add New Role" button.

A form for adding a new custom Role will appear on the screen. At this point, complete the fields:
- Role name - such as Buddy, HRBP, IT Support or Office Manager.
- Initials (optional) - enter two characters that will distinguish the Role in the list of Actions during Workflow configuration (if you leave the field blank, the Application will use the first two characters from your name)

- Color - select the color that will distinguish the Role in the Actions list during Workflow configuration
- Select employee - here you can designate employees who will be automatically assigned to a Role when starting Processes or will be treated as recommended employees for this Role (learn more 👉🏻 here)

- Decide whether a Role can point users to other Roles in the Process (learn more 👉🏻 here).

After filling out the form, click on "Save" to add a new Role in the Application.
 ☝🏻 You must know that this task will disappear from the Role Performer Portal if the person running the Process - designates a person when running the Process in the Admin Panel.
How to delete a created Role?
A Role created in the Settings section cannot be permanently deleted, but it can be archived. Simply click the three dots on the right in the list of Roles next to the Role selected for archiving and select the ‘Archive’ option.

By switching on the ‘Show archived items’ switch, you can view the Roles that have been archived and even restore them again by clicking on the three dots on the right and selecting the ‘Restore’ option. This way, you can include the restored Role in the workflow again.
What are the effects of archiving a Role?
- In the case of ongoing Processes, nothing changes - the Role still participates in the Process
- in case of newly launched Processes, you can still select a Role which has been archived in Settings, but which is still present in Workflow
- existing Actions, which are assigned in Workflow to the archived Role, remain unchanged
- however, you cannot create a new Action and assign it to an archived Role or change the recipient of an existing Action to an archived Role