After entering a given Action, you can see icons on the bar on the right side of the window:
 |
|
 |
|
 |
|
|
|
|
Action Name
For SMS or Email Actions, the name is only visible in the Workflow—it is not displayed to the User. For other Action types, the name is visible in the User Portal. You can edit the name in the upper left corner of the screen: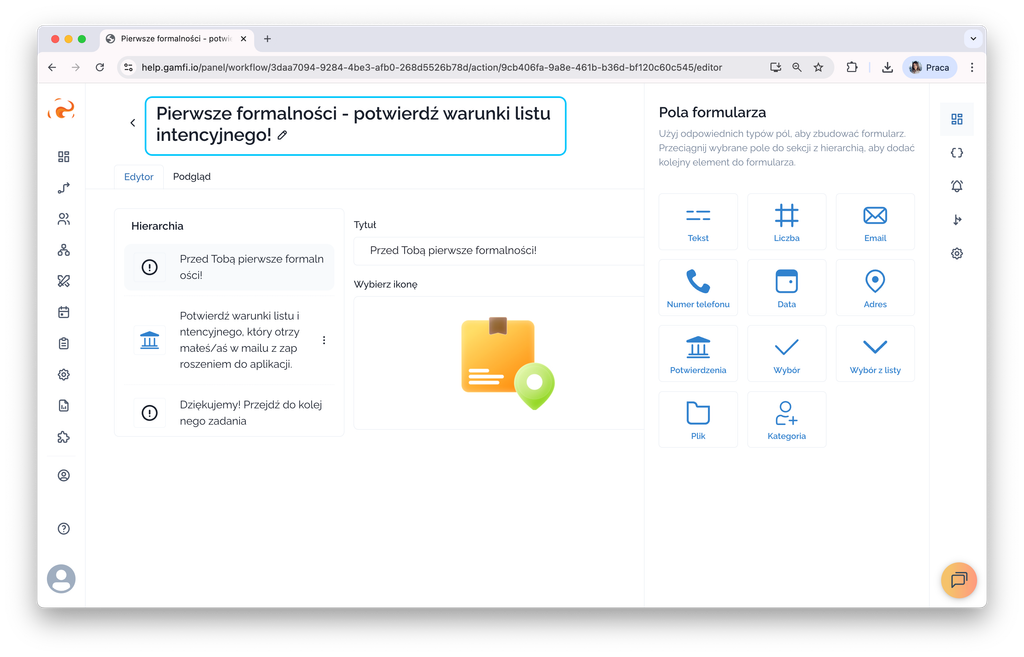
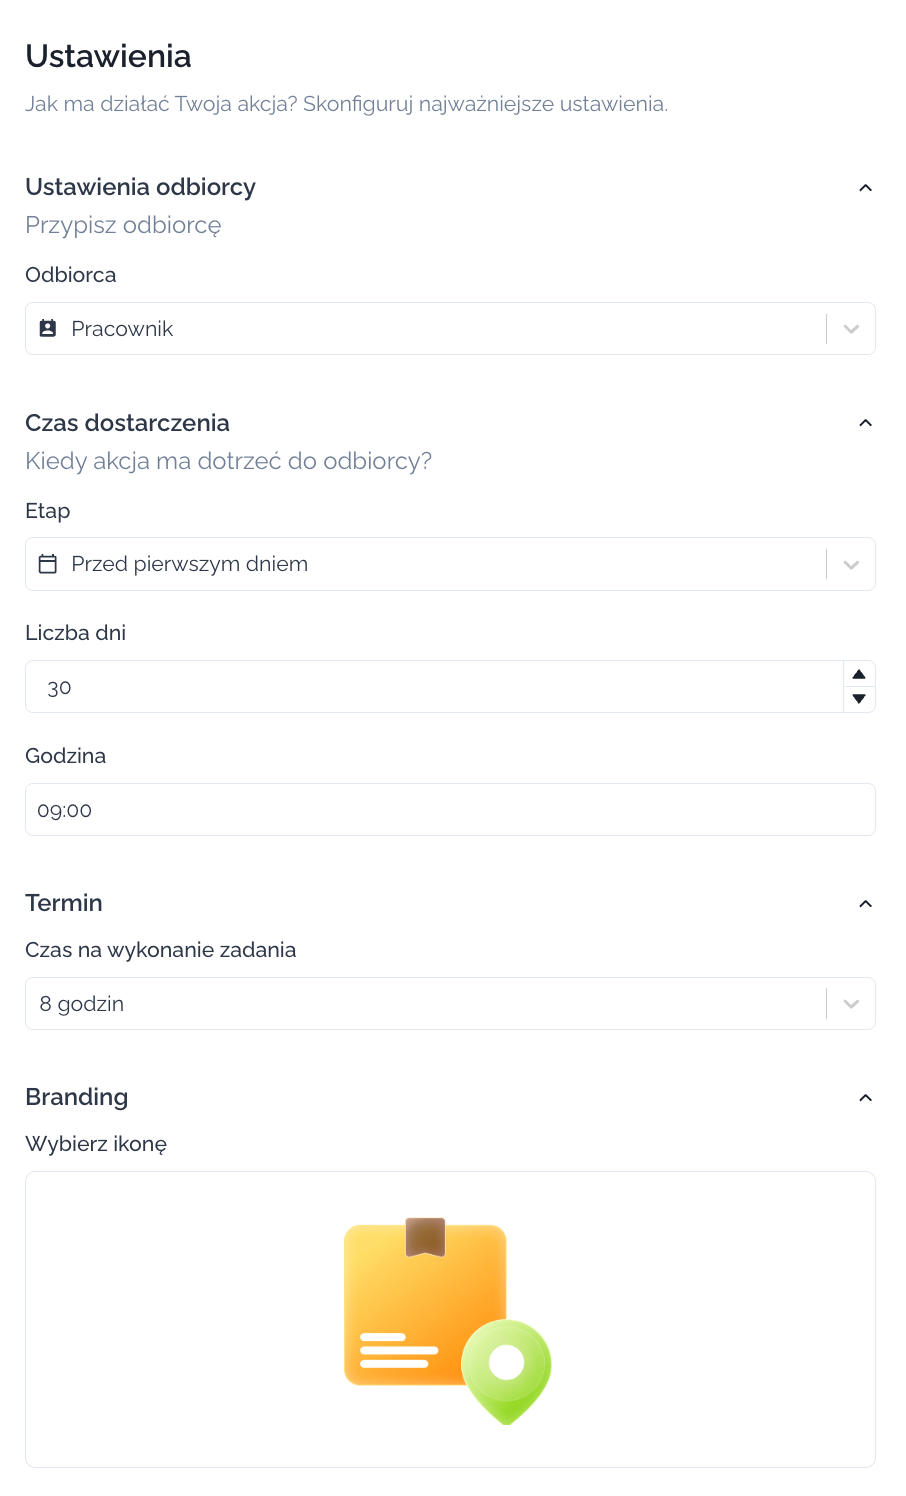
Main settings
Action Recipient - here you specify who the Action should be sent to - an Employee or a Role.
☝🏻 Remember! To assign a given Action to a selected Role, the Role must be added to the given Workflow.
Additional Recipients (only for Email Actions) - you can specify which users should be included in the email in FYI (For Your Information) mode.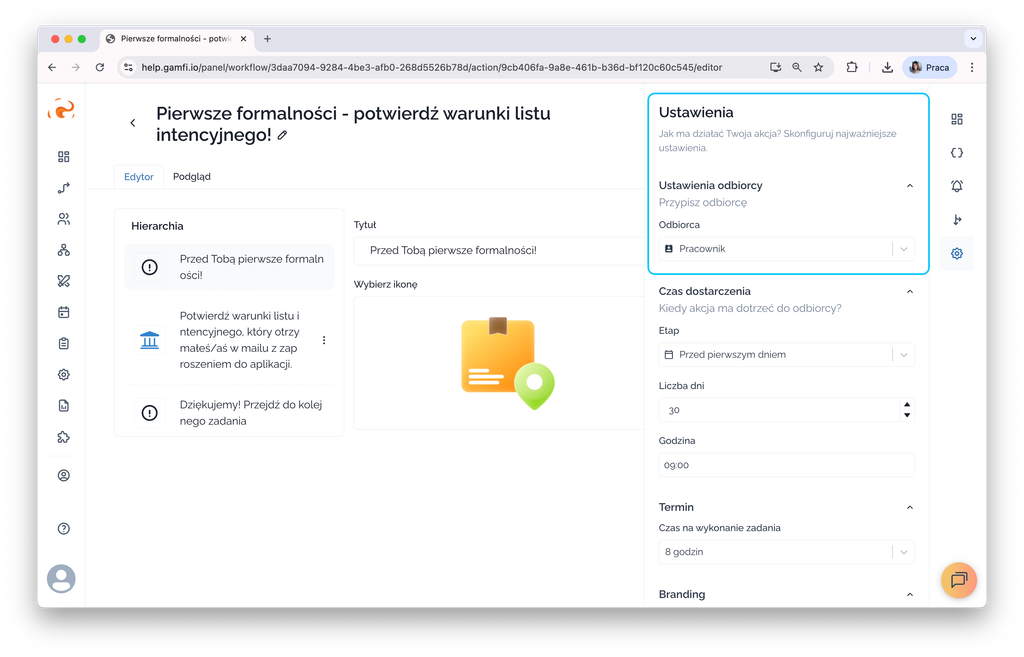
Time and date of delivery of the Action
Stage - All Actions added to the Workflow are time-scheduled and have a specific delivery date scheduled, based on a key date.
Actions can be automatically triggered in one of three periods, depending on the category of the selected Workflow.
💡Example:
The Onboarding Processes category covers the following periods:
- Before the first day - the period between the new employee accepting the offer and their first day on the job (preboarding)
- On the first day - the new employee's first day on the job
- After the first day - the period after the first day on the job
After selecting the period, set the number of days and the time for triggering the Action.
The defined date and time determine when the Action will be triggered in relation to the new employee's first day on the job.
💡Example:
You want Workflow to automatically send a message (e.g., reminding you that a new employee is coming in tomorrow) to the manager one day before the new employee is hired.
In this case, you can prepare a new Message type Action directed to the manager, which you set: 1 day before the first day / 10:00 am.
As a result, the manager will receive an automatic message 1 day before hiring a new employee at 10:00 am.
Deadline is the number of hours or days allowed to complete the task. This is an optional setting that causes the added Action to be treated as valid and failure to complete it by the deadline will be marked accordingly on the Dashboard.
💡Example:
- Are you committed to completing important Actions scheduled in Workflow?
- Do you want to make sure an employee completes initial health and safety training on the first day of work?
- Does an employee have to complete and return a personal questionnaire 10 days prior to employment in order to make it possible to prepare a contract for him/her?
- Should a manager prepare an entitlement request no more than a day before a new person comes into the organization?
Manage users' task execution priorities with DEADLINE TIME (time to complete an Action).

💡Example:
The employee was given a task to complete 5 days before he/she was hired at 10:00 a.m. The task had a time of 8h set for its completion . This means that the task should be completed by 6pm.
If this deadline is exceeded, the Action's name will change to red, and the Action itself will jump to the top of the to-do list, receiving the appropriate priority.
This function is for informational purposes only. The overdue task will still need to be completed, but it will be highlighted accordingly.
The Due Date function is best used for those Actions in the Process that are most important to us – they have high priority, such as HR Forms or equipment requests.
In addition to visually changing the appearance of the overdue Action and changing its position on the Portal's task list, you can also schedule overdue notifications, i.e., Alerts.
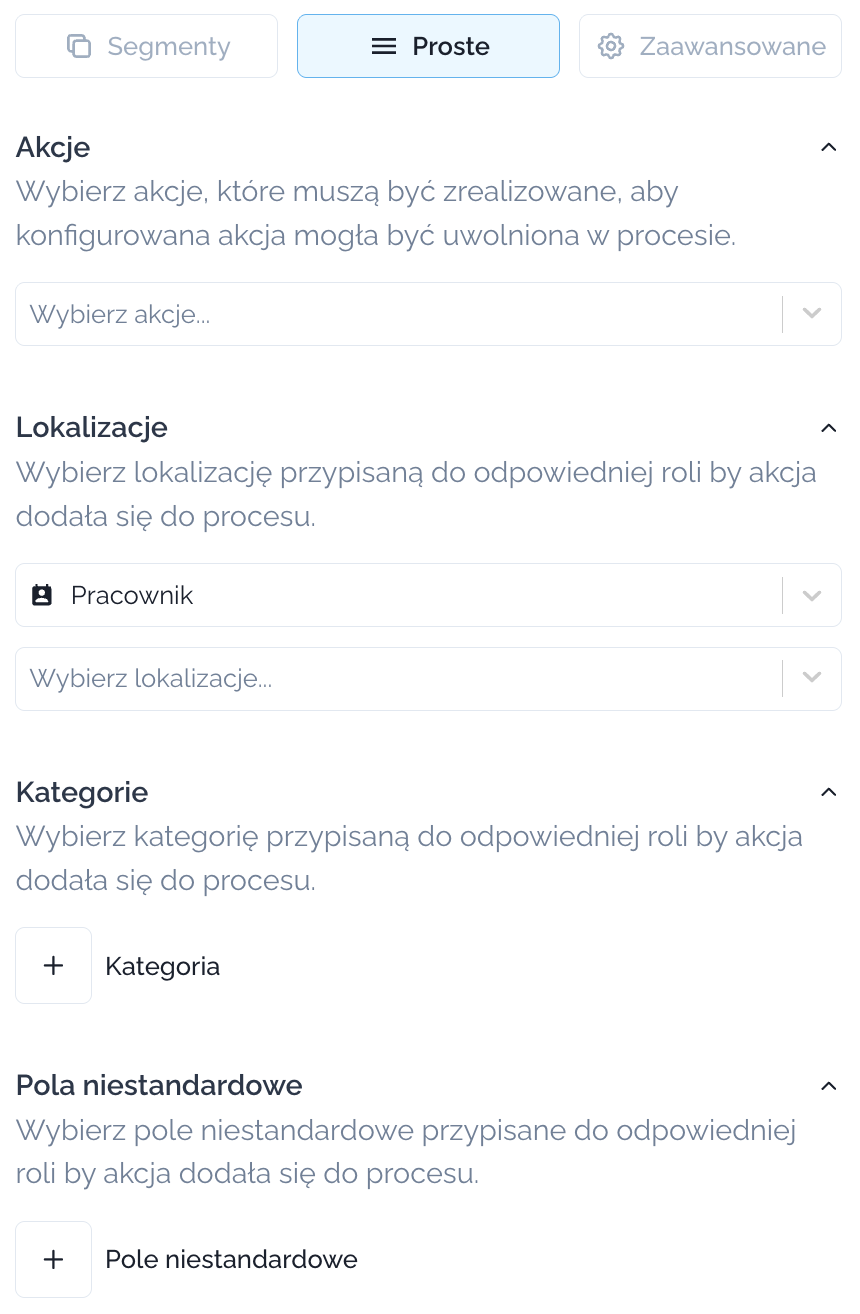
Conditions
Decide on what basis and to whom the Action is to be delivered.
Thanks to conditions, you decide:
- whether the Action will be added to the Process launched to the user,
- when the scheduled Action is released.
What does this mean? Lear more 👉🏻 here.
 |
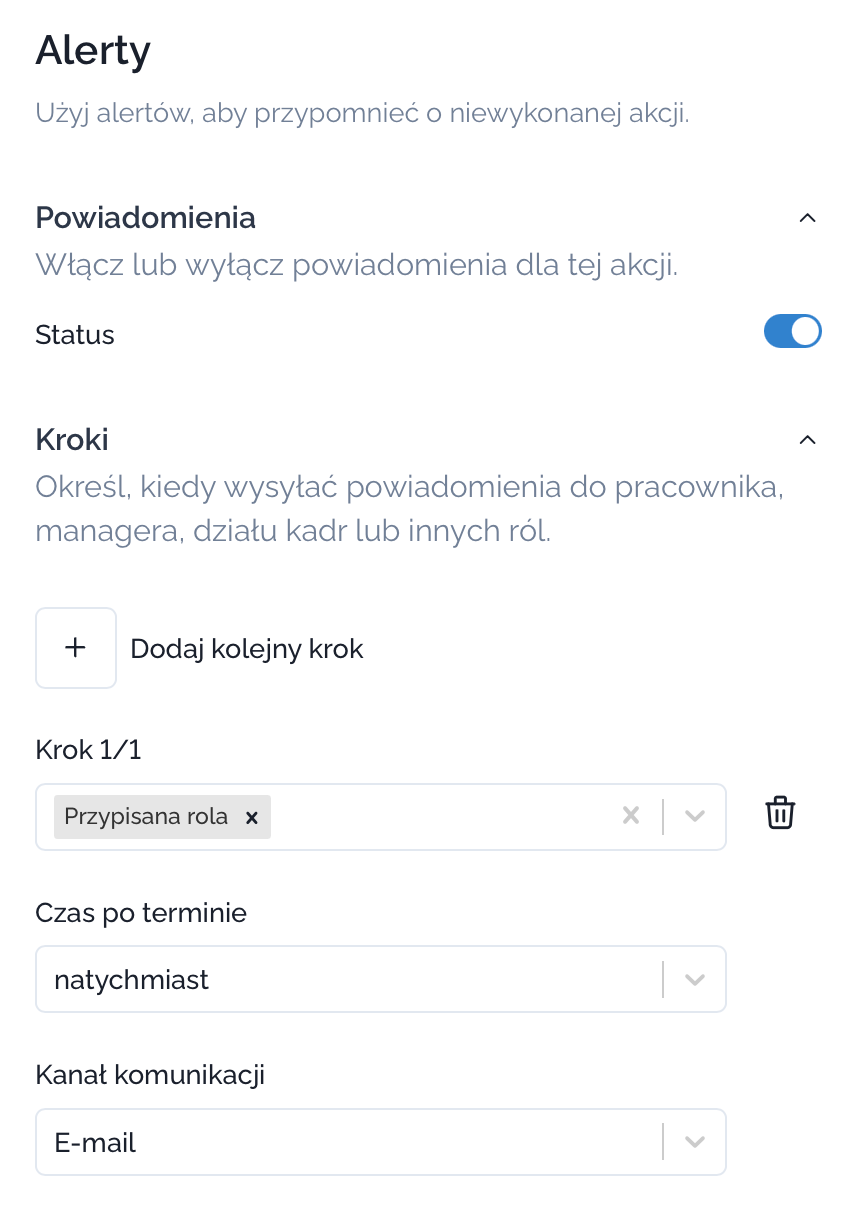
Alerts
Alerts are a function closely related to setting a deadline for completing a task, which you can read about 👉🏻 here.
If you set a deadline, you can additionally set an Alert that will automatically notify relevant users when the deadline is exceeded.
Read more about Alerts 👉🏻 here.
Form fields
Form fields are a feature that only appears when configuring Form, Report, and Knowledge Check Actions, i.e., those that require an employee to provide an answer.
Form fields are elements that allow you to create a full form, a short quiz, or a knowledge test.
In the forms you have the following types of fields to use:
- In the Stories Action: card, video, quiz, button,
- In the Form Action: text, number, email, phone number, date, address, confirmation, selection, selection from a list, file, category:
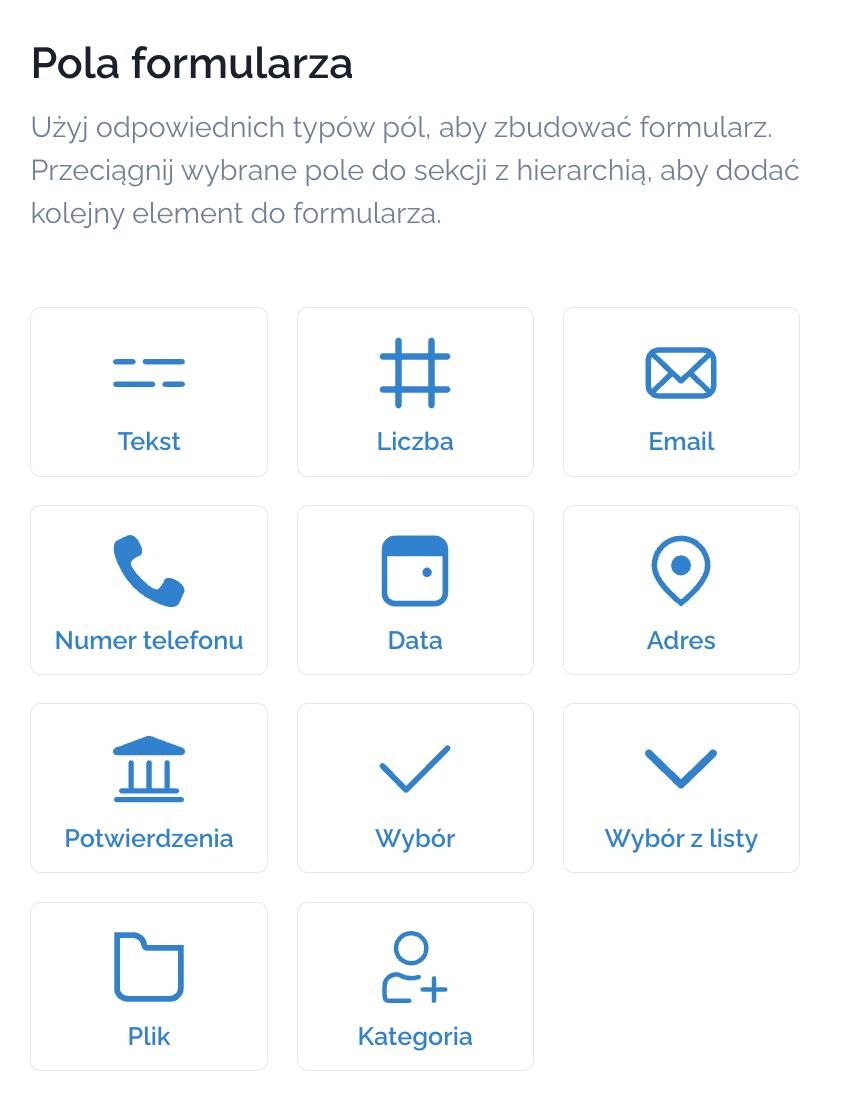
- In the Knowledge Check Action: quiz, set order, true/false, complete the phrase.
Snippets
Snippets is a tool that allows you to personalize the Action content in your Workflows, thus providing an even better user experience for everyone involved in the Processes.
Snippets are tags that, when inserted into new Actions (Email, SMS and form), dynamically insert data from the Gamfi People Platform (e.g., about a Process, employee or other Role), thus personalizing the content associated with the Action.
Learn more about Snippets 👉🏻 here.

You can add your own Snippets in Settings → Custom Fields - in the custom field settings there is a “Use as snippet” slider.